🇳🇿TAKING ACCEPTABLE VISA PHOTOS TECHNICAL REQUIREMENTS FOR PROFESSIONAL PHOTOGRAPHERS 1. Adjust camera settings • set the camera to take colour photos • set the camera to save images as JPG (or JPEG) files • set the colour to sRGB (to match the colours that most video monitors and printers reproduce) • change the camera’s colour balance to adapt to artificial lighting, and avoid an unnatural skin colour in the picture – use either: • flash • tungsten • daylight • The photo file size must be between 500KB and 3 MB • The photo must have dimensions between 900 x 1200 pixels and 2250 x 3000 pixels.

2. Position the person and camera correctly The image must be taken in portrait. The person must stand: • in front of a plain, light-coloured (not white) background • 1 to 1.5 metres in front of the background, to lesson shadow • 1 to 1.5 metres away from the camera, to keep facial features clear. For the best picture, use a tripod and set it so the camera is level with the person’s eyes. 3. Stop background shadows, lighting, and red-eye To stop shadows and red-eye, try some or all of the following: • take the photo in an area with a low, bright-white ceiling and a mounted flash that rotates (to bounce light off the ceiling) • use the digital camera’s flash sync-cable if it has one, and put the flash to the side of the camera • turn off the flash and use bright overhead lighting • shine a separation light on low power about 0.5 metres out from the background at the subject's lower to mid back level (to cancel out any shadows). 4. Get prepared The person in the photo must: • make sure no headwear covers their face • not wear bold clothing patterns • be the only face in the photo • face the camera with eyes open • must look directly at the lens. 5. Position the head and take the photo Before you take the photo, make sure the person’s head is positioned to match this example image: • the person’s face is in the centre, of the frame
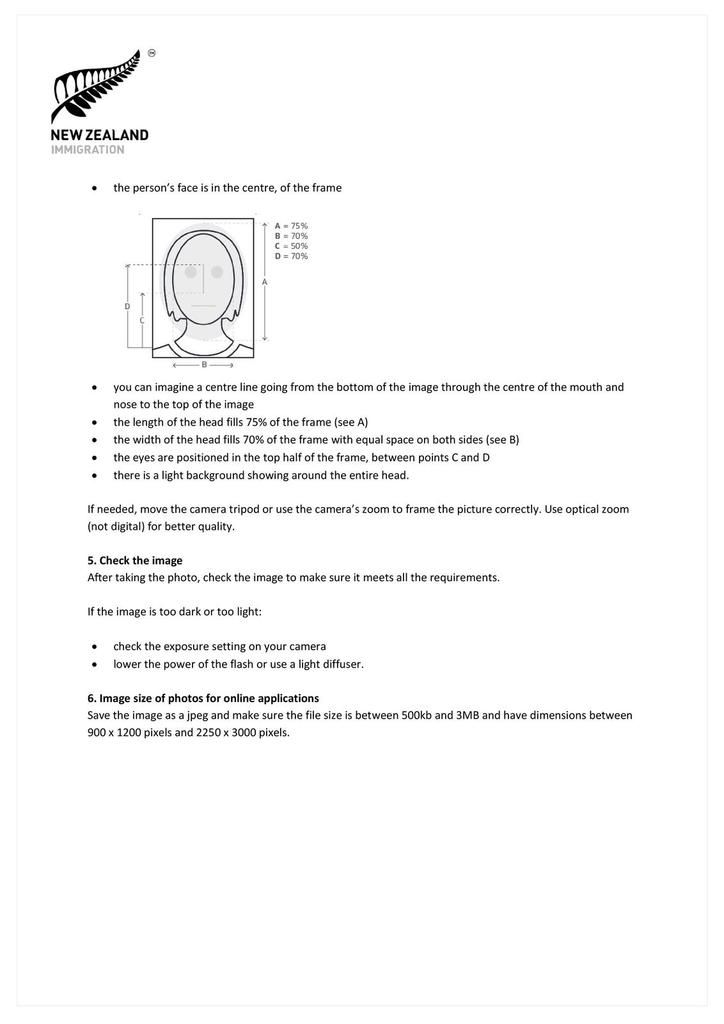
4. Get prepared The person in the photo must: • make sure no headwear covers their face • not wear bold clothing patterns • be the only face in the photo • face the camera with eyes open • must look directly at the lens. 5. Position the head and take the photo Before you take the photo, make sure the person’s head is positioned to match this example image: • the person’s face is in the centre, of the frame • you can imagine a centre line going from the bottom of the image through the centre of the mouth and nose to the top of the image • the length of the head fills 75% of the frame (see A) • the width of the head fills 70% of the frame with equal space on both sides (see B) • the eyes are positioned in the top half of the frame, between points C and D • there is a light background showing around the entire head. If needed, move the camera tripod or use the camera’s zoom to frame the picture correctly. Use optical zoom (not digital) for better quality. 5. Check the image After taking the photo, check the image to make sure it meets all the requirements. If the image is too dark or too light: • check the exposure setting on your camera • lower the power of the flash or use a light diffuser. 6. Image size of photos for online applications Save the image as a jpeg and make sure the file size is between 500kb and 3MB and have dimensions between 900 x 1200 pixels and 2250 x 3000 pixels.
/image%2F1253682%2F20210711%2Fob_c80d55_photographephotoidentitebebenouveaunem.png)

/image%2F1253682%2F20240306%2Fob_40ff0e_photoroom-20240303-182254.jpg)
/image%2F1253682%2F20231110%2Fob_52188b_photographemarseillephotopasseportbebe.jpg)
/image%2F1253682%2F20231026%2Fob_fdc8b0_1000013809.jpg)
/image%2F1253682%2F20231021%2Fob_ed2cf6_1000013766.jpg)